

Upholstery foam - you know, the stuff to make mascots
Upholstery foam, the foam used to make couch cushions, is a really nice foam to make costumes. Especially tocreate big shapes that stay light.
This is perfect for, among other things, making mascots and furries
I have worked with this foam a few times in the past. For small projects. To add a little fluffiness to a costume. But I really adopted it when I made my first mascot: Red Yoshi cosplay.
And I just fell in love. It’s so fun to work with. And it does so much fun stuff that you can't help but be happy when working with upholstery foam.
So, I told myself that I would spread happiness, and that I would give you a little overview of the material. So that you too can be happy.


Purchasing your material
It's not super fancy, but it does the job for your tests.
You are still going to have to re-work your form before achieving a satisfactory result. First, because the basic volume you've created isn't always perfect. But also because your pattern does not take into account the thickness of your foam.
So plan for more foam, because you're going to play around a bit to get to the shape that you want.


Cutting the pieces
Upholstery foam is like pretty much any foam. It's quite easy to cut. But there are still a few things to know.
You don't want to cut your pieces with scissors because it won't make a nice cut (the edge won't be straight). Plus, it might look good on ½ "or even 1" thick foam, but I can't see myself cutting 2" foam with simple scissors...
On the other hand, since it is rather soft, the x-acto knife does not work as well as on EVA foam. It works ... but it's not optimal.
Personally, my favorite tool for cutting upholstery foam is my electric roast knife*.
Because of the way it cuts (with the 2 blades moving back and forth), it cuts as well as scissors, without crushing the foam. And you'll be able to cut way more than with an x-acto knife before the blade gets too dull. It’s perfect!


Assembling of the parts
Now that your pieces are cut, you're going to want to put them together. My favorite glue for that is the Lepage Green contact glue. But I also use hot glue quite a bit.
The big advantage of hot glue is its instantaneity (is that a word? - anyway, you understand what I mean, right?). It sticks quickly.
On the other hand, once dry, it feels a bit crusty, and it's a bit heavier.
Lepage Green contact glue* is lighter on the whole costume. On the other hand, it takes a lot longer to dry. In fact, you are going to apply it on the 2 sides to be glued. Wait. Wait again. Find that it does not dry quickly. Wait a little longer. And finally put your pieces together. So... I suggest you have several things to do at the same time, so as not to feel like wasting your time.


Sculpting the foam
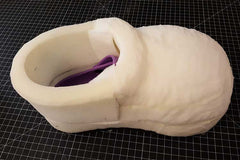
For some elements, it's easier to sculpt your foam than to make a pattern and put pieces together. This is the case with things like the muzzle or even the shoes.
In this case, you'll make a block (usually 2-3 layers stacked, depending on what you want to do) big enough to be able to sculpt whatever shape you want into it.
I love this technique. It's a more "organic" way to work. You've got a picture in mind, but it's not so calculated. My best advice is to always sculpt both shoes (or both sides of the muzzle) at the same time if you want it to be as symmetrical as possible. It’s easier that way.

Refining the shapes
Now that you're happy with your shape, you probably want to cover it up. I suggest a fairly thick and stretchy fabric (at least a little bit). You want something thick to hide any small sculpting errors, or the small dent that you may have made in your foam. And you want stretch fabric because it's really easier to covers up weird shapes.
My fabric of choice is polar. It’s quite inexpensive. It's rather easy to work with. And the little fluffy texture means that you lose the details a bit. So, less flaw and less visible seams. Which gives a somewhat cartoonish-ish look.
For furries, the go-to fabric is generally faux fur. And that’s just as cool as a material. It's even more "camouflaging". On the other hand, it is a little more complex to work with (depending on the length of the hair) and it's quite a bit more expensive.
To cover your foam shape, there are a few techniques. I'll tell you about the one I use the most. It's a fairly instinctive method, which doesn't require to make a pattern and adapt to most kind of fabric.
What I do is I cover a section with my fabric. Then I play with the fabric to see how I can cover it.
If necessary, I create a dart with the surplus, which I pin. It's a bit like making a molding pattern, but since I'm working directly with my fabric, I immediately see if I can cheat and stretch my fabric to make smaller darts (or just avoid doing any). I immediately see how my fabric behaves on the foam.


Adding details
Once the biggest part is covered, you'll want to add the finishing details… which vary greatly from one project to another: dragon crest, dog ears, squirrel teeth, frog eyes... You have as many type of addition as you have type of costume.
At this point, it depends mainly on your project.
Personally, I use different materials for those added parts.
Upholstery foam is still an awesome option for additions that stay fluffy. But, I also like the EVA foam to make parts that need to be more rigid. For the smallest details, I often use leatherette to give a different look in terms of texture.


Covering your upholstery foam shape is pretty much done by hand. And for that, you will need a good needle.
I hope this will inspire you with some cool projects. If so, let me know. I love seeing the cool projects.


Talk to you soon.
Until then… Keep on crafting!
🤓✂🐙
Leave a comment