


Setting up your cosplay and LARP workshop in 5 phases
Setting up (or redoing) your workshop isn't a small task. Depending on the space you've got, all kinds of challenges pop up.
You might have a big game of Tetris to play to fit all your furniture in. Maybe you have to share your space. Maybe you're seriously lacking organization. Or you're just not sure of the best way to set things up.
Whether you make cosplay, LARP gear, or both, the challenges are usually the same: lots of materials, lots of tools, and never enough space for it all.
I've had to set up (or redo) my own workshop several times myself. Over time, I've picked up a few tips and tricks. So I'm going to show you all of it and give you a 5-phase game plan for a successful workshop setup.
1. Make yourself a plan
The last time I decided to overhaul my workshop, I started by making myself a plan to really visualize my space.
Whether it's for a massive full transformation or just a small tweak, it's super handy to make a scale plan. It doesn't take long to put together, and it lets you test out a ton of ideas really quickly.
Take the time to measure your space and your furniture so you can easily test out your layout ideas.
I made my plan in Illustrator. It's handy because I could test different layouts really easily. But you could just as well do it with all kinds of other software. Or even by hand.

It's the same as with anything else. When you start a project, it's always a good idea to make yourself a plan.
Whether it's a list of work steps, a quick sketch of the prop you're about to make, or a template or pattern for your next costume. Whether your project is big or small, my best advice: start with a plan. 🤓
2. Make sure you have a good work surface
No matter the size of your workshop, you need a good work surface. And by that, I don't necessarily mean a huge one. Sure, it's great to have something big. But if you don't have the space, at least make sure your surface is pleasant to work at. That your table is at the right height. That your tools are set up well on it. And above all, that it's well lit.
The cutting table
If you sew, having a big cutting table in your workshop is pretty much a must. You want to be able to lay out your fabric to cut your pattern pieces as easily as possible.
For a long time, I had a work table with an awkward height and a serious lack of storage. During my last workshop overhaul, I fixed that.
Let me introduce you to my new cutting table:

It's a big assembly of different IKEA modules:
- 2 KALLAX 2x4 units
- 3 EKBY ALEX drawer shelves
- 2 LAGKAPTEN 60cm x 200cm tabletops
- 2 OLOV adjustable table legs
- 1 ALEX drawer unit on casters
The Kallax units are super handy for storing materials for whatever project I'm currently working on.
The EKBY ALEX shelves add just enough height so I can work comfortably standing up, plus drawers to keep my pencils and other little odds and ends within reach.
The 2 tabletops side by side give me an incredible work surface (120cm x 200cm, it's huge and I love it!).
I could have gotten one big melamine board to avoid having a seam right down the middle of my table. But given the size, I wasn't too sure it would make it down my winding staircase to the basement.
*I didn't have the OLOV legs yet when I took the photo, because they were out of stock when I ordered. The table holds up great without them. But just to be safe, I added them anyway.
The ALEX unit on casters is just a bonus. It's not attached to anything, but the space at the end of the table is perfect for tucking it underneath.

The sewing machine corner
Finding something to set up my sewing machines on was pretty simple. But since there are always things I like to have within reach while sewing, I made sure to have storage for my small tools, thread, and everything else.

The IKEA recipe (yeah, what can I say, IKEA just isn't complicated):
- 3 LINNMON 60cm x 100cm tabletops
- 2 ALEX drawer units
- 4 ADILS legs
That gives me a really long surface, big enough to fit both my machines (and more 😉). And the drawer units make the whole thing super stable.
The crafting corner
I know not everyone can do this... But since I've got a big workshop, I can afford to have several separate work stations.
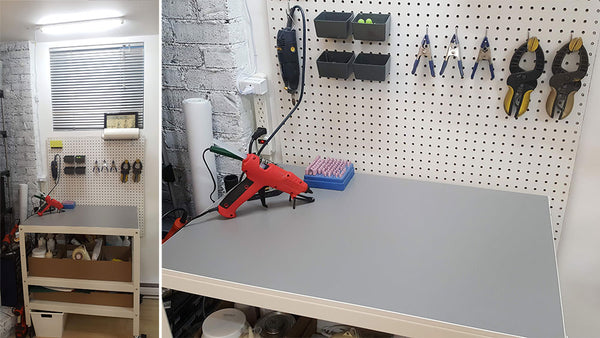
I added myself a little extra crafting corner. A space dedicated to EVA foam work, painting, and crafting in general. Just to keep my cutting table nice and clean for fabric.
If you do both LARP and cosplay, having a separate station for foam and crafting really changes the game. EVA foam creates dust, paint splatters, hot glue drips... it's just not the same needs as a cutting table for fabric.
I loved the utility cart I bought when I set up my dream ironing station so much that I decided to buy a second one.
I used big cardboard boxes to make myself a kind of drawer system (just to make it easier to access the stuff at the back).
Lighting
Another thing not to underestimate for a pleasant work space is lighting. You know, you want to actually see what you're doing, right?
I work in a basement. I don't get much natural light. And anyway, I wouldn't want to rely on that, because I don't just work while it's light out (and I'm sure you don't either).
I found myself something really cool: LED light strips. They give a neon look, but the light itself is much nicer (neon lights have such a weird color...). You can plug them in individually or link them together. And they're super easy to install. No need to change your ceiling fixture, it's something that plugs into the wall (with a little switch along the cord).
My workshop is pretty big, so I bought 4 of them.
I put 2 above my cutting table. They plug into my ceiling fixture with an adapter, like the ones used for outdoor Christmas lights. So I can control them with my switch.

(ok, the cords attached to the ceiling look a bit weird, but whatever...)
I've got 2 more sets above my ironing corner and crafting corner.
I also installed a couple of extra small lamps above my sewing machines.

And the coolest part of all this is that I control everything from my phone. I bought smart plugs and plugged all my lights into them.
That way, I don't need to walk around my whole workshop turning everything off one by one when I'm done. I shut it all off from my phone.
It also means I can double-check that I actually turned everything off if I have a doubt a couple hours later (that happens to me a lot, honestly). And there's even a setting to have everything shut off automatically at a certain time (just in case).

The ADHD in me finds this genuinely so handy. So handy that I've got one on my iron's plug (to make sure it doesn't stay on for hours) and one on the outlet my glue gun is plugged into (in case I forget it...).
3. Think about a good storage system
There are tons of options for storing your stuff in your workshop, and the best storage system for me isn't necessarily the best system for you.
It's really important to think about how YOU want to store your things. And I don't just mean sorting your buttons by size or color. I mean mainly what you're going to put them in. What's easiest for you. What makes finding your stuff easier, but also makes putting it away faster.
(I already talked about this in my article on everyday organization, you can check it out if you want more tips on everyday storage systems)
For me, it's really important to have things that are easy to put away (bins with lids, all stacked up, drives me nuts). I'm lazy and impatient when it comes to putting my stuff away. But I also need to be able to find my stuff quickly.
I really love fabric bins. I've got them pretty much everywhere (under my cutting table, in the Kallax units, but also on shelves).
But for smaller stuff, I spent a long time looking for the best system. I tried a ton of things over the years. And that's what you should do too. Try different methods, test things out, tweak stuff... You'll eventually find THE storage system that's made for you.
Compartment drawers
I owe my new system to Alexandre Chappel. A guy from Norway who makes all kinds of things. Very often, furniture for improving his workshop (which I'm seriously obsessed with, by the way).
I love watching him build furniture so much that he almost made me want to build my own from scratch. But the truth is I'm just not equipped for that at all... So, IKEA. 😅
That said, he came up with a storage system for his drawers. And it's really cool.
Everything is 3D printed. There's a grid you glue to the bottom of your drawer. And buckets. Tons of buckets. In every size imaginable. And the bottom of the buckets has a raised pattern that locks onto the grid. Which means everything stays perfectly in place. It looks super clean. And since every bucket size fits perfectly into the grid, everything's easily interchangeable.
So, I bought his files so I could set up a fully clean storage system in my drawers too.


I'll be totally honest with you. It takes forever to print a whole batch of buckets like that. And ultimately, it's not that economical if you make as many compartments as I did (I've got 21 new drawers in my workshop after all). But I don't regret it one bit. I really, really love my little compartments. I can move them around as needed and change up the bucket sizes. Everything stays in place. It looks great. It's clean. And it's easy to access and easy to put away.

Wild.
If you do 3D printing and this speaks to you, go check out his website (he's got a ton of other really cool stuff).
By the way, the tags you might have noticed on the drawers are also 3D printed. It's a design I made myself. It's available for free in my shop.

Ribbon and lace drawer
Obviously, this little compartment system isn't necessarily the best option for everything.
For example, for my elastic, lace, ribbon, trim, and other stuff like that, I went with something else. A more affordable system that you can make super easily too. All you need is corrugated cardboard (and let me tell you, after that IKEA order, I've got plenty to spare!).
The idea is super simple:
- I made myself drawer sides with slots by layering pieces of corrugated cardboard.
- Then I cut cardboard strips just the right length to slide into the little slots.
- I wrap my ribbons, lace, and other stuff around the cardboard and slide it into place.
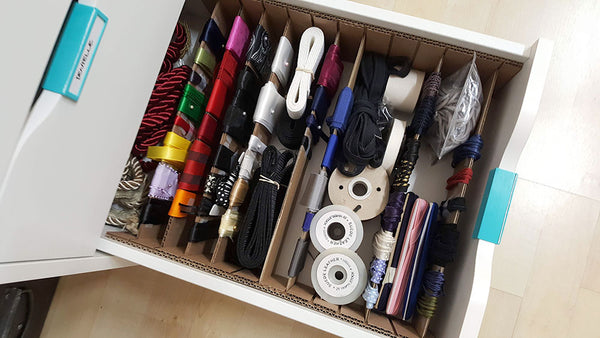
The whole thing slides like a charm. And it even creates little sections in my drawer to hold other stuff. Simple, but so effective.
Pegboard
If you didn't already know, I worship at the altar of the pegboard god. What can I say, pegboards are life.
So now I've got even more of them (my husband didn't think that was even possible 😅).
It's just so handy to see all your tools at a glance. Both for my sewing tools and my crafting tools (heat gun, rotary tool, glue gun, etc.). Everything's visible, everything's accessible.

The trick with pegboards is to test things out: position your favorite tools, add useful little hooks, move things around, change what's not working... It's like everything else: find what works for you.
4. Plan for time. A lot of time.
There's no getting around it, setting up a workshop is a long process. Build it into your schedule.
My workshop overhaul involved quite a lot:
- Taking everything off the walls, then patching and repainting walls full of holes (man, there were a lot of shelves...)
- Getting rid of furniture I no longer needed
- Sorting through my stash
- Assembling new furniture (8 separate modules to build and put together to create what I wanted)
- Installing new pegboards, shelves, and other things
- Installing the lighting system
- Organizing materials in the new drawers (21 new drawers is a lot of drawers)
All of that takes time. And often, more time than you think. So plan for time. And plan a buffer. Just to be safe. 🤓
5. Make a little room for something pretty
I know that, as a cosplayer, LARPer, or crafter of any kind, you've got a lot of stuff. And I'm the first one to suggest putting storage absolutely everywhere. Shelves up to the ceiling, pegboards on every free spot, shelving units...
But don't forget to leave a little space for decor. Whether it's a few photos of your best creations, some of your props hung on the wall, illustrations from your favorite artists.
It's inspiring to have a few beautiful things around you. You don't need to fill every spot with it. But it'll bring your workshop to life.
I've still got things left to put up. But for now I'm showing off illustrations from SoMeow and Marie-Eve Pharand. Some gorgeous stickers from Warlock's Quill. And a few cute creations and weird little trinkets I really like.


There's always little things left to adjust and add. But overall, my workshop is set up and ready for my next projects!

(Psst! If you'd like to see how my workshop evolved, I've got photos of what it looked like from 2016 to 2020 in my article on everyday organization.)
If you've got questions about setting up your own workshop, or want to share your own setup, come chat with me on Instagram. I love seeing other creators' workshops!
And once your workshop is fully set up and ready to roll, my patterns are waiting for you:
And if you want to stay in the loop on new releases, promos, and new articles to help with your creative projects, join The Harbour!
In the meantime,
Happy sewing! Happy crafting! 🤓✂🐙